Autoencoders are artificial neural networks capable of learning efficient representations of the input data (these representations are called codings) without any supervision (i.e., the training set is unlabeled). These codings typically have a much lower dimensionality than the input data, making autoencoders useful for dimensionality reduction.
Autoencoders learn to encode the input data into a lower-dimensional representation, and then decode it back to the original data. The goal of autoencoders is to minimize the reconstruction error, which measures how well the output matches the input. Autoencoders can be seen as a way of learning the latent features or hidden structure of the data, and they can be used for data compression, denoising, anomaly detection, and generative modeling.
More importantly, autoencoders act as powerful feature detectors, and they can be used for unsupervised pretraining of deep neural networks.
Lastly, they are capable of randomly generating new data that looks very similar to the training data; this is called a generative model. For example, you could train an autoencoder on pictures of faces, and it would then be able to generate new faces. Surprisingly, autoencoders work by simply learning to copy their inputs to their outputs. This may sound like a trivial task, but we will see that constraining the network in various ways can make it rather difficult. For example, you can limit the size of the internal representation, or you can add noise to the inputs and train the network to recover the original inputs. These constraints prevent the autoencoder from trivially copying the inputs directly to the outputs, which forces it to learn efficient ways of representing the data. In short, the codings are byproducts of the autoencoder’s attempt to learn the identity function under some constraints.
Autoencoders were first introduced by Rumelhart, Hinton, and Williams in 1986 with the goal of learning to reconstruct the input observations with the lowest error possible.
Why would one want to learn to reconstruct the input observations? If you have problems imagining what that means, think of having a dataset made of images. An autoencoder would be an algorithm that can give as output an image that is as similar as possible to the input one. You may be confused, as there is no apparent reason of doing so. To better understand why autoencoders are useful we need a more informative (although not yet unambiguous) definition.
An autoencoder is a type of algorithm with the primary purpose of learning an "informative" representation of the data that can be used for different applications (see Bank, D., Koenigstein, N., and Giryes, R., Autoencoders) by learning to reconstruct a set of input observations well enough.
Autoencoders are neural networks where the outputs are its own inputs. They are split into an encoder part which maps the input \( \boldsymbol{x} \) via a function \( f(\boldsymbol{x},\boldsymbol{W}) \) (this is the encoder part) to a so-called code part (or intermediate part) with the result \( \boldsymbol{h} \)
$$ \boldsymbol{h} = f(\boldsymbol{x},\boldsymbol{W})), $$where \( \boldsymbol{W} \) are the weights to be determined. The decoder parts maps, via its own parameters (weights given by the matrix \( \boldsymbol{V} \) and its own biases) to the final ouput
$$ \tilde{\boldsymbol{x}} = g(\boldsymbol{h},\boldsymbol{V})). $$The goal is to minimize the construction error.
In most typical architectures, the encoder and the decoder are neural networks since they can be easily trained with existing software libraries such as TensorFlow or PyTorch with back propagation.
In general, the encoder can be written as a function \( g \) that will depend on some parameters
$$ \mathbf{h}_{i} = g(\mathbf{x}_{i}), $$where \( \mathbf{h}_{i}\in\mathbb{R}^{q} \) (the latent feature representation) is the output of the encoder block where we evaluate it using the input \( \mathbf{x}_{i} \).
Note that we have \( g:\mathbb{R}^{n}\rightarrow\mathbb{R}^{q} \) The decoder and the output of the network \( \tilde{\mathbf{x}}_{i} \) can be written then as a second generic function of the latent features
$$ \tilde{\mathbf{x}}_{i} = f\left(\mathbf{h}_{i}\right) = f\left(g\left(\mathbf{x}_{i}\right)\right), $$where \( \tilde{\mathbf{x}}_{i}\mathbf{\in }\mathbb{R}^{n} \).
Training an autoencoder simply means finding the functions \( g(\cdot) \) and \( f(\cdot) \) that satisfy
$$ \textrm{arg}\min_{f,g}< \left[\Delta (\mathbf{x}_{i}, f(g\left(\mathbf{x}_{i}\right))\right]>. $$The standard setup is done via a standard feed forward neural network (FFNN), or what is called a Feed Forward Autoencoder.
A typical FFNN architecture has an odd number of layers and is symmetrical with respect to the middle layer.
Typically, the first layer has a number of neurons \( n_{1} = n \) which equals the size of the input observation \( \mathbf{x}_{\mathbf{i}} \).
As we move toward the center of the network, the number of neurons in each layer drops in some measure. The middle layer usually has the smallest number of neurons. The fact that the number of neurons in this layer is smaller than the size of the input, is often called the bottleneck.

In almost all practical applications, the layers after the middle one are a mirrored version of the layers before the middle one. For example, an autoencoder with three layers could have the following numbers of neurons:
\( n_{1} = 10 \), \( n_{2} = 5 \) and then \( n_{3} = n_{1} = 10 \) where the input dimension is equal to ten.
All the layers up to and including the middle one, make what is called the encoder, and all the layers from and including the middle one (up to the output) make what is called the decoder.
If the FFNN training is successful, the result will be a good approximation of the input \( \tilde{\mathbf{x}}_{i}\approx\mathbf{x}_{i} \).
What is essential to notice is that the decoder can reconstruct the input by using only a much smaller number of features than the input observations initially have.
The output of the middle layer \( \mathbf{h}_{\mathbf{i}} \) are also called a learned representation of the input observation \( \mathbf{x}_{i} \).
The encoder can reduce the number of dimensions of the input observation and create a learned representation of the input that has a smaller dimension \( q < n \).
This learned representation is enough for the decoder to reconstruct the input accurately (if the autoencoder training was successful as intended).
In autoencoders based on neural networks, the output layer's activation function plays a particularly important role. The most used functions are ReLU and Sigmoid.
The ReLU activation function can assume all values in the range \( \left[0,\infty\right] \). As a remainder, its formula is
$$ \textrm{ReLU}\left(x\right) = \max\left(0,x\right). $$This choice is good when the input observations \(\mathbf{x}_{i}\) assume a wide range of positive values. If the input \( \mathbf{x}_{i} \) can assume negative values, the ReLU is, of course, a terrible choice, and the identity function is a much better choice. It is then common to replace to the ReLU with the so-called Leaky ReLu or just modified ReLU.
The ReLU activation function for the output layer is well suited for cases when the input observations \(\mathbf{x}_{i}\) assume a wide range of positive real values.
The sigmoid function \( \sigma \) can assume all values in the range \( [0,1] \),
$$ \sigma\left(x\right) =\frac{1}{1+e^{-x}}. $$This activation function can only be used if the input observations \( \mathbf{x}_{i} \) are all in the range \( [0,1] \) or if you have normalized them to be in that range. Consider as an example the MNIST dataset. Each value of the input observation \( \mathbf{x}_{i} \) (one image) is the gray values of the pixels that can assume any value from 0 to 255. Normalizing the data by dividing the pixel values by 255 would make each observation (each image) have only pixel values between 0 and 1. In this case, the sigmoid would be a good choice for the output layer's activation function.
If an autoencoder is trying to solve a regression problem, the most common choice as a loss function is the Mean Square Error
$$ L_{\textrm{MSE}} = \textrm{MSE} = \frac{1}{n}\sum_{i = 1}^{n}\left\vert\vert\mathbf{x}_{i}-\tilde{\mathbf{x}}_{i}\right\vert\vert^{2}_2. $$If the activation function of the output layer of the AE is a sigmoid function, thus limiting neuron outputs to be between 0 and 1, and the input features are normalized to be between 0 and 1 we can use as loss function the binary cross-entropy. This cots/loss function is typically used in classification problems, but it works well for autoencoders. The formula for it is
$$ L_{\textrm{CE}} = -\frac{1}{n}\sum_{i = 1}^{n}\sum_{j = 1}^{p}[x_{j,i} \log\tilde{x}_{j,i}+\left(1-x_{j,i}\right)\log (1-\tilde{x}_{j,i})]. $$The reconstruction error (RE) is a metric that gives you an indication of how good (or bad) the autoencoder was able to reconstruct the input observation \( \mathbf{x}_{i} \). The most typical RE used is the MSE
$$ \textrm{RE}\equiv \textrm{MSE} = \frac{1}{n}\sum_{i = 1}^{n}\left\vert\vert\mathbf{x}_{i}-\tilde{\mathbf{x}}_{i}\right\vert\vert^{2}_2. $$
What is an Autoencoder? An autoencoder (AE) is a neural network trained to reconstruct its input: \( \hat{x}=\mathrm{Dec}(\mathrm{Enc}(x)) \).
Training objective: minimize reconstruction loss, e.g. MSE \mathcal{L}(\theta,\phi)=\frac{1}{N}\sum_{i=1}^N \|x^{(i)}-g_\phi(f_\theta(x^{(i)}))\|^2_2.
The covariance matrix is given as
$$ \boldsymbol{C}[\boldsymbol{x}] = \frac{1}{n}\boldsymbol{X}^T\boldsymbol{X}= \mathbb{E}[\boldsymbol{X}^T\boldsymbol{X}]. $$Let us now assume that we can perform a series of orthogonal transformations where we employ some orthogonal matrices \( \boldsymbol{S} \). These matrices are defined as \( \boldsymbol{S}\in {\mathbb{R}}^{p\times p} \) and obey the orthogonality requirements \( \boldsymbol{S}\boldsymbol{S}^T=\boldsymbol{S}^T\boldsymbol{S}=\boldsymbol{I} \). The matrix can be written out in terms of the column vectors \( \boldsymbol{s}_i \) as \( \boldsymbol{S}=[\boldsymbol{s}_0,\boldsymbol{s}_1,\dots,\boldsymbol{s}_{p-1}] \) and \( \boldsymbol{s}_i \in {\mathbb{R}}^{p} \).
Assume also that there is a transformation \( \boldsymbol{S}^T\boldsymbol{C}[\boldsymbol{x}]\boldsymbol{S}=\boldsymbol{C}[\boldsymbol{y}] \) such that the new matrix \( \boldsymbol{C}[\boldsymbol{y}] \) is diagonal with elements \( [\lambda_0,\lambda_1,\lambda_2,\dots,\lambda_{p-1}] \).
That is we have
$$ \boldsymbol{C}[\boldsymbol{y}] = \mathbb{E}[\boldsymbol{S}^T\boldsymbol{X}^T\boldsymbol{X}T\boldsymbol{S}]=\boldsymbol{S}^T\boldsymbol{C}[\boldsymbol{x}]\boldsymbol{S}, $$since the matrix \( \boldsymbol{S} \) is not a data dependent matrix. Multiplying with \( \boldsymbol{S} \) from the left we have
$$ \boldsymbol{S}\boldsymbol{C}[\boldsymbol{y}] = \boldsymbol{C}[\boldsymbol{x}]\boldsymbol{S}, $$and since \( \boldsymbol{C}[\boldsymbol{y}] \) is diagonal we have for a given eigenvalue \( i \) of the covariance matrix that
$$ \boldsymbol{S}_i\lambda_i = \boldsymbol{C}[\boldsymbol{x}]\boldsymbol{S}_i. $$In the derivation of the PCA theorem we will assume that the eigenvalues are ordered in descending order, that is \( \lambda_0 > \lambda_1 > \dots > \lambda_{p-1} \).
The eigenvalues tell us then how much we need to stretch the corresponding eigenvectors. Dimensions with large eigenvalues have thus large variations (large variance) and define therefore useful dimensions. The data points are more spread out in the direction of these eigenvectors. Smaller eigenvalues mean on the other hand that the corresponding eigenvectors are shrunk accordingly and the data points are tightly bunched together and there is not much variation in these specific directions. Hopefully then we could leave it out dimensions where the eigenvalues are very small. If \( p \) is very large, we could then aim at reducing \( p \) to \( l < < p \) and handle only \( l \) features/predictors.
Here's how we would proceed in setting up the algorithm for the PCA, see also discussion below here. Set up the datapoints for the design/feature matrix \( \boldsymbol{X} \) with \( \boldsymbol{X}\in {\mathbb{R}}^{n\times p} \), with the predictors/features \( p \) referring to the column numbers and the entries \( n \) being the row elements.
$$ \boldsymbol{X}=\begin{bmatrix} x_{0,0} & x_{0,1} & x_{0,2}& \dots & \dots x_{0,p-1}\\ x_{1,0} & x_{1,1} & x_{1,2}& \dots & \dots x_{1,p-1}\\ x_{2,0} & x_{2,1} & x_{2,2}& \dots & \dots x_{2,p-1}\\ \dots & \dots & \dots & \dots \dots & \dots \\ x_{n-2,0} & x_{n-2,1} & x_{n-2,2}& \dots & \dots x_{n-2,p-1}\\ x_{n-1,0} & x_{n-1,1} & x_{n-1,2}& \dots & \dots x_{n-1,p-1}\\ \end{bmatrix}. $$We will use a simple example first with two-dimensional data drawn from a multivariate normal distribution with the following mean and covariance matrix (we have fixed these quantities but will play around with them below):
$$ \mu = (-1,2) \qquad \Sigma = \begin{bmatrix} 4 & 2 \\ 2 & 2 \end{bmatrix} $$Note that the mean refers to each column of data. We will generate \( n = 10000 \) points \( X = \{ x_1, \ldots, x_N \} \) from this distribution, and store them in the \( 1000 \times 2 \) matrix \( \boldsymbol{X} \). This is our design matrix where we have forced the covariance and mean values to take specific values.
The following Python code aids in setting up the data and writing out the design matrix. Note that the function multivariate returns also the covariance discussed above and that it is defined by dividing by \( n-1 \) instead of \( n \).
import numpy as np
import pandas as pd
import matplotlib.pyplot as plt
from IPython.display import display
n = 10000
mean = (-1, 2)
cov = [[4, 2], [2, 2]]
X = np.random.multivariate_normal(mean, cov, n)
Now we are going to implement the PCA algorithm. We will break it down into various substeps.
The first step of PCA is to compute the sample mean of the data and use it to center the data. Recall that the sample mean is
$$ \mu_n = \frac{1}{n} \sum_{i=1}^n x_i $$and the mean-centered data \( \bar{X} = \{ \bar{x}_1, \ldots, \bar{x}_n \} \) takes the form
$$ \bar{x}_i = x_i - \mu_n. $$When you are done with these steps, print out \( \mu_n \) to verify it is close to \( \mu \) and plot your mean centered data to verify it is centered at the origin! The following code elements perform these operations using pandas or using our own functionality for doing so. The latter, using numpy is rather simple through the mean() function.
df = pd.DataFrame(X)
# Pandas does the centering for us
df = df -df.mean()
# we center it ourselves
X_centered = X - X.mean(axis=0)
Alternatively, we could use the functions we discussed earlier for scaling the data set. That is, we could have used the StandardScaler function in Scikit-Learn, a function which ensures that for each feature/predictor we study the mean value is zero and the variance is one (every column in the design/feature matrix). You would then not get the same results, since we divide by the variance. The diagonal covariance matrix elements will then be one, while the non-diagonal ones need to be divided by \( 2\sqrt{2} \) for our specific case.
Now we are going to use the mean centered data to compute the sample covariance of the data by using the following equation
$$ \begin{equation*} \Sigma_n = \frac{1}{n-1} \sum_{i=1}^n \bar{x}_i^T \bar{x}_i = \frac{1}{n-1} \sum_{i=1}^n (x_i - \mu_n)^T (x_i - \mu_n) \end{equation*} $$where the data points \( x_i \in \mathbb{R}^p \) (here in this example \( p = 2 \)) are column vectors and \( x^T \) is the transpose of \( x \). We can write our own code or simply use either the functionaly of numpy or that of pandas, as follows
print(df.cov())
print(np.cov(X_centered.T))
Note that the way we define the covariance matrix here has a factor \( n-1 \) instead of \( n \). This is included in the cov() function by numpy and pandas. Our own code here is not very elegant and asks for obvious improvements. It is tailored to this specific \( 2\times 2 \) covariance matrix.
# extract the relevant columns from the centered design matrix of dim n x 2
x = X_centered[:,0]
y = X_centered[:,1]
Cov = np.zeros((2,2))
Cov[0,1] = np.sum(x.T@y)/(n-1.0)
Cov[0,0] = np.sum(x.T@x)/(n-1.0)
Cov[1,1] = np.sum(y.T@y)/(n-1.0)
Cov[1,0]= Cov[0,1]
print("Centered covariance using own code")
print(Cov)
plt.plot(x, y, 'x')
plt.axis('equal')
plt.show()
Depending on the number of points \( n \), we will get results that are close to the covariance values defined above. The plot shows how the data are clustered around a line with slope close to one. Is this expected? Try to change the covariance and the mean values. For example, try to make the variance of the first element much larger than that of the second diagonal element. Try also to shrink the covariance (the non-diagonal elements) and see how the data points are distributed.
Now we are ready to solve for the principal components! To do so we diagonalize the sample covariance matrix \( \Sigma \). We can use the function np.linalg.eig to do so. It will return the eigenvalues and eigenvectors of \( \Sigma \). Once we have these we can perform the following tasks:
where \( v_0 \) is the first principal component.
Collecting all these steps we can write our own PCA function and compare this with the functionality included in Scikit-Learn.
The code here outlines some of the elements we could include in the analysis. Feel free to extend upon this in order to address the above questions.
# diagonalize and obtain eigenvalues, not necessarily sorted
EigValues, EigVectors = np.linalg.eig(Cov)
# sort eigenvectors and eigenvalues
#permute = EigValues.argsort()
#EigValues = EigValues[permute]
#EigVectors = EigVectors[:,permute]
print("Eigenvalues of Covariance matrix")
for i in range(2):
    print(EigValues[i])
FirstEigvector = EigVectors[:,0]
SecondEigvector = EigVectors[:,1]
print("First eigenvector")
print(FirstEigvector)
print("Second eigenvector")
print(SecondEigvector)
#thereafter we do a PCA with Scikit-learn
from sklearn.decomposition import PCA
pca = PCA(n_components = 2)
X2Dsl = pca.fit_transform(X)
print("Eigenvector of largest eigenvalue")
print(pca.components_.T[:, 0])
This code does not contain all the above elements, but it shows how we can use Scikit-Learn to extract the eigenvector which corresponds to the largest eigenvalue. Try to address the questions we pose before the above code. Try also to change the values of the covariance matrix by making one of the diagonal elements much larger than the other. What do you observe then?
We assume now that we have a design matrix \( \boldsymbol{X} \) which has been centered as discussed above. For the sake of simplicity we skip the overline symbol. The matrix is defined in terms of the various column vectors \( [\boldsymbol{x}_0,\boldsymbol{x}_1,\dots, \boldsymbol{x}_{p-1}] \) each with dimension \( \boldsymbol{x}\in {\mathbb{R}}^{n} \).
The PCA theorem states that minimizing the above reconstruction error corresponds to setting \( \boldsymbol{W}=\boldsymbol{S} \), the orthogonal matrix which diagonalizes the empirical covariance(correlation) matrix. The optimal low-dimensional encoding of the data is then given by a set of vectors \( \boldsymbol{z}_i \) with at most \( l \) vectors, with \( l < < p \), defined by the orthogonal projection of the data onto the columns spanned by the eigenvectors of the covariance(correlations matrix).
To show the PCA theorem let us start with the assumption that there is one vector \( \boldsymbol{s}_0 \) which corresponds to a solution which minimized the reconstruction error \( J \). This is an orthogonal vector. It means that we now approximate the reconstruction error in terms of \( \boldsymbol{w}_0 \) and \( \boldsymbol{z}_0 \) as
We are almost there, we have obtained a relation between minimizing the reconstruction error and the variance and the covariance matrix. Minimizing the error is equivalent to maximizing the variance of the projected data.
We could trivially maximize the variance of the projection (and thereby minimize the error in the reconstruction function) by letting the norm-2 of \( \boldsymbol{w}_0 \) go to infinity. However, this norm since we want the matrix \( \boldsymbol{W} \) to be an orthogonal matrix, is constrained by \( \vert\vert \boldsymbol{w}_0 \vert\vert_2^2=1 \). Imposing this condition via a Lagrange multiplier we can then in turn maximize
$$ J(\boldsymbol{w}_0)= \boldsymbol{w}_0^T\boldsymbol{C}[\boldsymbol{x}]\boldsymbol{w}_0+\lambda_0(1-\boldsymbol{w}_0^T\boldsymbol{w}_0). $$Taking the derivative with respect to \( \boldsymbol{w}_0 \) we obtain
$$ \frac{\partial J(\boldsymbol{w}_0)}{\partial \boldsymbol{w}_0}= 2\boldsymbol{C}[\boldsymbol{x}]\boldsymbol{w}_0-2\lambda_0\boldsymbol{w}_0=0, $$meaning that
$$ \boldsymbol{C}[\boldsymbol{x}]\boldsymbol{w}_0=\lambda_0\boldsymbol{w}_0. $$The direction that maximizes the variance (or minimizes the construction error) is an eigenvector of the covariance matrix! If we left multiply with \( \boldsymbol{w}_0^T \) we have the variance of the projected data is
$$ \boldsymbol{w}_0^T\boldsymbol{C}[\boldsymbol{x}]\boldsymbol{w}_0=\lambda_0. $$If we want to maximize the variance (minimize the construction error) we simply pick the eigenvector of the covariance matrix with the largest eigenvalue. This establishes the link between the minimization of the reconstruction function \( J \) in terms of an orthogonal matrix and the maximization of the variance and thereby the covariance of our observations encoded in the design/feature matrix \( \boldsymbol{X} \).
The proof for the other eigenvectors \( \boldsymbol{w}_1,\boldsymbol{w}_2,\dots \) can be established by applying the above arguments and using the fact that our basis of eigenvectors is orthogonal, see Murphy chapter 12.2. The discussion in chapter 12.2 of Murphy's text has also a nice link with the Singular Value Decomposition theorem. For categorical data, see chapter 12.4 and discussion therein.
For more details, see for example Vidal, Ma and Sastry, chapter 2.
For a detailed demonstration of the geometric interpretation, see Vidal, Ma and Sastry, section 2.1.2.
Principal Component Analysis (PCA) is by far the most popular dimensionality reduction algorithm. First it identifies the hyperplane that lies closest to the data, and then it projects the data onto it.
The following Python code uses NumPy’s svd() function to obtain all the principal components of the training set, then extracts the first two principal components. First we center the data using either pandas or our own code
import numpy as np
import pandas as pd
from IPython.display import display
np.random.seed(100)
# setting up a 10 x 5 vanilla matrix
rows = 10
cols = 5
X = np.random.randn(rows,cols)
df = pd.DataFrame(X)
# Pandas does the centering for us
df = df -df.mean()
display(df)

# we center it ourselves
X_centered = X - X.mean(axis=0)
# Then check the difference between pandas and our own set up
print(X_centered-df)
#Now we do an SVD
U, s, V = np.linalg.svd(X_centered)
c1 = V.T[:, 0]
c2 = V.T[:, 1]
W2 = V.T[:, :2]
X2D = X_centered.dot(W2)
print(X2D)
PCA assumes that the dataset is centered around the origin. Scikit-Learn’s PCA classes take care of centering the data for you. However, if you implement PCA yourself (as in the preceding example), or if you use other libraries, don’t forget to center the data first.
Once you have identified all the principal components, you can reduce the dimensionality of the dataset down to \( d \) dimensions by projecting it onto the hyperplane defined by the first \( d \) principal components. Selecting this hyperplane ensures that the projection will preserve as much variance as possible.
W2 = V.T[:, :2]
X2D = X_centered.dot(W2)
Scikit-Learn’s PCA class implements PCA using SVD decomposition just like we did before. The following code applies PCA to reduce the dimensionality of the dataset down to two dimensions (note that it automatically takes care of centering the data):
#thereafter we do a PCA with Scikit-learn
from sklearn.decomposition import PCA
pca = PCA(n_components = 2)
X2D = pca.fit_transform(X)
print(X2D)
After fitting the PCA transformer to the dataset, you can access the principal components using the components variable (note that it contains the PCs as horizontal vectors, so, for example, the first principal component is equal to
pca.components_.T[:, 0]
Another very useful piece of information is the explained variance ratio of each principal component, available via the \( explained\_variance\_ratio \) variable. It indicates the proportion of the dataset’s variance that lies along the axis of each principal component.
We can now repeat the above but applied to real data, in this case the Wisconsin breast cancer data. Here we compute performance scores on the training data using logistic regression.
import matplotlib.pyplot as plt
import numpy as np
from sklearn.model_selection import  train_test_split
from sklearn.datasets import load_breast_cancer
from sklearn.linear_model import LogisticRegression
cancer = load_breast_cancer()

X_train, X_test, y_train, y_test = train_test_split(cancer.data,cancer.target,random_state=0)

logreg = LogisticRegression()
logreg.fit(X_train, y_train)
print("Train set accuracy from Logistic Regression: {:.2f}".format(logreg.score(X_train,y_train)))
# We scale the data
from sklearn.preprocessing import StandardScaler
scaler = StandardScaler()
scaler.fit(X_train)
X_train_scaled = scaler.transform(X_train)
X_test_scaled = scaler.transform(X_test)
# Then perform again a log reg fit
logreg.fit(X_train_scaled, y_train)
print("Train set accuracy scaled data: {:.2f}".format(logreg.score(X_train_scaled,y_train)))
#thereafter we do a PCA with Scikit-learn
from sklearn.decomposition import PCA
pca = PCA(n_components = 2)
X2D_train = pca.fit_transform(X_train_scaled)
# and finally compute the log reg fit and the score on the training data
logreg.fit(X2D_train,y_train)
print("Train set accuracy scaled and PCA data: {:.2f}".format(logreg.score(X2D_train,y_train)))
We see that our training data after the PCA decomposition has a performance similar to the non-scaled data.
Instead of arbitrarily choosing the number of dimensions to reduce down to, it is generally preferable to choose the number of dimensions that add up to a sufficiently large portion of the variance (e.g., 95%). Unless, of course, you are reducing dimensionality for data visualization — in that case you will generally want to reduce the dimensionality down to 2 or 3. The following code computes PCA without reducing dimensionality, then computes the minimum number of dimensions required to preserve 95% of the training set’s variance:
pca = PCA()
pca.fit(X_train)
cumsum = np.cumsum(pca.explained_variance_ratio_)
d = np.argmax(cumsum >= 0.95) + 1
You could then set \( n\_components=d \) and run PCA again. However, there is a much better option: instead of specifying the number of principal components you want to preserve, you can set \( n\_components \) to be a float between 0.0 and 1.0, indicating the ratio of variance you wish to preserve:
pca = PCA(n_components=0.95)
X_reduced = pca.fit_transform(X_train)
One problem with the preceding implementation of PCA is that it requires the whole training set to fit in memory in order for the SVD algorithm to run. Fortunately, Incremental PCA (IPCA) algorithms have been developed: you can split the training set into mini-batches and feed an IPCA algorithm one minibatch at a time. This is useful for large training sets, and also to apply PCA online (i.e., on the fly, as new instances arrive).
Scikit-Learn offers yet another option to perform PCA, called Randomized PCA. This is a stochastic algorithm that quickly finds an approximation of the first d principal components. Its computational complexity is \( O(m \times d^2)+O(d^3) \), instead of \( O(m \times n^2) + O(n^3) \), so it is dramatically faster than the previous algorithms when \( d \) is much smaller than \( n \).
The kernel trick is a mathematical technique that implicitly maps instances into a very high-dimensional space (called the feature space), enabling nonlinear classification and regression with Support Vector Machines. Recall that a linear decision boundary in the high-dimensional feature space corresponds to a complex nonlinear decision boundary in the original space. It turns out that the same trick can be applied to PCA, making it possible to perform complex nonlinear projections for dimensionality reduction. This is called Kernel PCA (kPCA). It is often good at preserving clusters of instances after projection, or sometimes even unrolling datasets that lie close to a twisted manifold. For example, the following code uses Scikit-Learn’s KernelPCA class to perform kPCA with an
from sklearn.decomposition import KernelPCA
rbf_pca = KernelPCA(n_components = 2, kernel="rbf", gamma=0.04)
X_reduced = rbf_pca.fit_transform(X)
There are many other dimensionality reduction techniques, several of which are available in Scikit-Learn.
Here are some of the most popular:
We will, again, use the MNIST database, which has \( 60000 \) training examples and a test set of 10000 handwritten numbers. The images have only one color channel and have a size of \( 28\times 28 \) pixels. We start by uploading the data set.
# import the Torch packages
# transforms are used to preprocess the images, e.g. crop, rotate, normalize, etc
import torch
from torchvision import datasets,transforms

# specify the data path in which you would like to store the downloaded files
# ToTensor() here is used to convert data type to tensor

train_dataset = datasets.MNIST(root='./mnist_data/', train=True, transform=transforms.ToTensor(), download=True)
test_dataset = datasets.MNIST(root='./mnist_data/', train=False, transform=transforms.ToTensor(), download=True)
print(train_dataset)
batchSize=128

#only after packed in DataLoader, can we feed the data into the neural network iteratively
train_loader = torch.utils.data.DataLoader(dataset=train_dataset, batch_size=batchSize, shuffle=True)
test_loader = torch.utils.data.DataLoader(dataset=test_dataset, batch_size=batchSize, shuffle=False)
We visualize the images here using the \( imshow \) function function and the \( make\_grid \) function from PyTorch to arrange and display them.
# package we used to manipulate matrix
import numpy as np
# package we used for image processing
from matplotlib import pyplot as plt
from torchvision.utils import make_grid

def imshow(img):
    npimg = img.numpy()
    #transpose: change array axis to correspond to the plt.imshow() function
    plt.imshow(np.transpose(npimg, (1, 2, 0)))
    plt.show()

# load the first 16 training samples from next iteration
# [:16,:,:,:] for the 4 dimension of examples, first dimension take first 16, other dimension take all data
# arrange the image in grid
examples, _ = next(iter(train_loader))
example_show=make_grid(examples[:16,:,:,:], 4)

# then display them
imshow(example_show)
Our autoencoder consists of two parts, see also the TensorFlow example above. The encoder and decoder parts are represented by two fully connected feed forward neural networks where we use the standard Sigmoid function. In the encoder part we reduce the dimensionality of the image from \( 28\times 28=784 \) pixels to first \( 16\times 16=256 \) pixels and then to 128 pixels. The 128 pixel representation is then used to define the representation of the input and the input to the decoder part. The latter attempts to reconstruct the images.
import torch.nn as nn
import torch.nn.functional as F
import torch.optim as optim

# Network Parameters
num_hidden_1 = 256  # 1st layer num features
num_hidden_2 = 128  # 2nd layer num features (the latent dim)
num_input = 784  # MNIST data input (img shape: 28*28)


# Building the encoder
class Autoencoder(nn.Module):
    def __init__(self, x_dim, h_dim1, h_dim2):
        super(Autoencoder, self).__init__()
        # encoder part
        self.fc1 = nn.Linear(x_dim, h_dim1)
        self.fc2 = nn.Linear(h_dim1, h_dim2)
        # decoder part
        self.fc3 = nn.Linear(h_dim2, h_dim1)
        self.fc4 = nn.Linear(h_dim1, x_dim)

    def encoder(self, x):
        x = torch.sigmoid(self.fc1(x))
        x = torch.sigmoid(self.fc2(x))
        return x

    def decoder(self, x):
        x = torch.sigmoid(self.fc3(x))
        x = torch.sigmoid(self.fc4(x))
        return x

    def forward(self, x):
        x = self.encoder(x)
        x = self.decoder(x)
        return x

# When initializing, it will run __init__() function as above
model = Autoencoder(num_input, num_hidden_1, num_hidden_2)
We define here the cost/loss function and the optimizer we employ (Adam here).
# define loss function and parameters
optimizer = optim.Adam(model.parameters())
epoch = 100
# MSE loss will calculate Mean Squared Error between the inputs
loss_function = nn.MSELoss()

print('====Training start====')
for i in range(epoch):
    train_loss = 0
    for batch_idx, (data, _) in enumerate(train_loader):
        # prepare input data
        inputs = torch.reshape(data,(-1, 784)) # -1 can be any value.
        # set gradient to zero
        optimizer.zero_grad()
        # feed inputs into model
        recon_x = model(inputs)
        # calculating loss
        loss = loss_function(recon_x, inputs)
        # calculate gradient of each parameter
        loss.backward()
        train_loss += loss.item()
        # update the weight based on the gradient calculated
        optimizer.step()
    if i%10==0:
        print('====> Epoch: {} Average loss: {:.9f}'.format(i, train_loss ))
print('====Training finish====')
As we have trained the network, we will now reconstruct various test samples to see if the model can generalize to data which were not included in the training set.
# load 16 images from testset
inputs, _ = next(iter(test_loader))
inputs_example = make_grid(inputs[:16,:,:,:],4)
imshow(inputs_example)

#convert from image to tensor
#inputs=inputs.cuda()
inputs=torch.reshape(inputs,(-1,784))

# get the outputs from the trained model
outputs=model(inputs)

#convert from tensor to image
outputs=torch.reshape(outputs,(-1,1,28,28))
outputs=outputs.detach().cpu()

#show the output images
outputs_example = make_grid(outputs[:16,:,:,:],4)
imshow(outputs_example)
After training the auto-encoder, we can now use the model to reconstruct some images. In order to reconstruct different training images, the model has learned to recognize how the image looks like and describe it in the 128-dimensional latent space. In other words, the visual information of images is compressed and encoded in the 128-dimensional representations. As we assume that samples from the same categories should be more visually similar than those from different classes, the representations can then be used for image recognition, i.e., handwritten digit images recognition in our case.
One simple way to recognize images is to randomly select ten training samples from each class and annotate them with the corresponding label. Then given the test data, we can predict which classes they belong to by finding the most similar labelled training samples to them.
# get 100 image-label pairs from training set
x_train, y_train = next(iter(train_loader))

# 10 classes, 10 samples per class, 100 in total
candidates = np.random.choice(batchSize, 10*10)

# randomly select 100 samples
x_train = x_train[candidates]
y_train = y_train[candidates]

# display the selected samples and print their labels

imshow(make_grid(x_train[:100,:,:,:],10))
print(y_train.reshape(10, 10))

# get 100 image-label pairs from test set
x_test, y_test = next(iter(train_loader))
candidates_test = np.random.choice(batchSize, 10*10)

x_test = x_test[candidates_test]
y_test = y_test[candidates_test]

# display the selected samples and print their labels
imshow(make_grid(x_test[:100,:,:,:],10))

print(y_test.reshape(10, 10))
# compute the representations of training and test samples
#h_train=model.encoder(torch.reshape(x_train.cuda(),(-1,784)))
#h_test=model.encoder(torch.reshape(x_test.cuda(),(-1,784)))
h_train=model.encoder(torch.reshape(x_train,(-1,784)))
h_test=model.encoder(torch.reshape(x_test,(-1,784)))

# find the nearest training samples to each test instance, in terms of MSE
MSEs = np.mean(np.power(np.expand_dims(h_test.detach().cpu(), axis=1) - np.expand_dims(h_train.detach().cpu(), axis=0), 2), axis=2)
neighbours = MSEs.argmin(axis=1)
predicts = y_train[neighbours]

# print(np.stack([y_test, predicts], axis=1))
print('Recognition accuracy according to the learned representation is %.1f%%' % (100 * (y_test == predicts).numpy().astype(np.float32).mean()))

The course has two central parts
The following topics have been discussed:
The course introduces a variety of central algorithms and methods essential for studies of data analysis and machine learning. The course is project based and through the various projects, normally three, you will be exposed to fundamental research problems in these fields, with the aim to reproduce state of the art scientific results. The students will learn to develop and structure large codes for studying these systems, get acquainted with computing facilities and learn to handle large scientific projects. A good scientific and ethical conduct is emphasized throughout the course.
Huge amounts of data sets require automation, classical analysis tools often inadequate. High energy physics hit this wall in the 90’s. In 2009 single top quark production was determined via Boosted decision trees, Bayesian Neural Networks, etc.
Where to find recent results:
Which regularization and hyperparameters? \( L_1 \) or \( L_2 \), soft classifiers, depths of trees and many other. Need to explore a large set of hyperparameters and regularization methods.
When do we resample?
Based on multi-layer nonlinear neural networks, deep learning can learn directly from raw data, automatically extract and abstract features from layer to layer, and then achieve the goal of regression, classification, or ranking. Deep learning has made breakthroughs in computer vision, speech processing and natural language, and reached or even surpassed human level. The success of deep learning is mainly due to the three factors: big data, big model, and big computing.
In the past few decades, many different architectures of deep neural networks have been proposed, such as
The approaches to machine learning are many, but are often split into two main categories. In supervised learning we know the answer to a problem, and let the computer deduce the logic behind it. On the other hand, unsupervised learning is a method for finding patterns and relationship in data sets without any prior knowledge of the system. Some authours also operate with a third category, namely reinforcement learning. This is a paradigm of learning inspired by behavioural psychology, where learning is achieved by trial-and-error, solely from rewards and punishment.
Another way to categorize machine learning tasks is to consider the desired output of a system. Some of the most common tasks are:
What is known as restricted Boltzmann Machines (RMB) have received a lot of attention lately. One of the major reasons is that they can be stacked layer-wise to build deep neural networks that capture complicated statistics.
The original RBMs had just one visible layer and a hidden layer, but recently so-called Gaussian-binary RBMs have gained quite some popularity in imaging since they are capable of modeling continuous data that are common to natural images.
Furthermore, they have been used to solve complicated quantum mechanical many-particle problems or classical statistical physics problems like the Ising and Potts classes of models.
Why use a generative model rather than the more well known discriminative deep neural networks (DNN)?
History: The RBM was developed by amongst others Geoffrey Hinton, called by some the "Godfather of Deep Learning", working with the University of Toronto and Google.
A BM is what we would call an undirected probabilistic graphical model with stochastic continuous or discrete units.
It is interpreted as a stochastic recurrent neural network where the state of each unit(neurons/nodes) depends on the units it is connected to. The weights in the network represent thus the strength of the interaction between various units/nodes.
It turns into a Hopfield network if we choose deterministic rather than stochastic units. In contrast to a Hopfield network, a BM is a so-called generative model. It allows us to generate new samples from the learned distribution.
A standard BM network is divided into a set of observable and visible units \( \hat{x} \) and a set of unknown hidden units/nodes \( \hat{h} \).
Additionally there can be bias nodes for the hidden and visible layers. These biases are normally set to \( 1 \).
BMs are stackable, meaning they cwe can train a BM which serves as input to another BM. We can construct deep networks for learning complex PDFs. The layers can be trained one after another, a feature which makes them popular in deep learning
However, they are often hard to train. This leads to the introduction of so-called restricted BMs, or RBMS. Here we take away all lateral connections between nodes in the visible layer as well as connections between nodes in the hidden layer. The network is illustrated in the figure below.
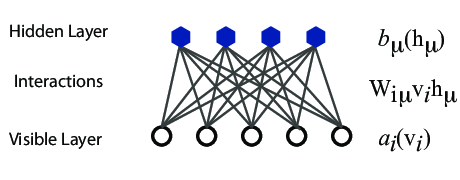
The goal of the hidden layer is to increase the model's expressive power. We encode complex interactions between visible variables by introducing additional, hidden variables that interact with visible degrees of freedom in a simple manner, yet still reproduce the complex correlations between visible degrees in the data once marginalized over (integrated out).
The network parameters, to be optimized/learned:The restricted Boltzmann machine is described by a Boltzmann distribution
$$ \begin{align} P_{rbm}(\mathbf{x},\mathbf{h}) = \frac{1}{Z} e^{-\frac{1}{T_0}E(\mathbf{x},\mathbf{h})}, \label{_auto1} \end{align} $$where \( Z \) is the normalization constant or partition function, defined as
$$ \begin{align} Z = \int \int e^{-\frac{1}{T_0}E(\mathbf{x},\mathbf{h})} d\mathbf{x} d\mathbf{h}. \label{_auto2} \end{align} $$It is common to ignore \( T_0 \) by setting it to one.
The function \( E(\mathbf{x},\mathbf{h}) \) gives the energy of a configuration (pair of vectors) \( (\mathbf{x}, \mathbf{h}) \). The lower the energy of a configuration, the higher the probability of it. This function also depends on the parameters \( \mathbf{a} \), \( \mathbf{b} \) and \( W \). Thus, when we adjust them during the learning procedure, we are adjusting the energy function to best fit our problem.
An expression for the energy function is
$$ E(\hat{x},\hat{h}) = -\sum_{ia}^{NA}b_i^a \alpha_i^a(x_i)-\sum_{jd}^{MD}c_j^d \beta_j^d(h_j)-\sum_{ijad}^{NAMD}b_i^a \alpha_i^a(x_i)c_j^d \beta_j^d(h_j)w_{ij}^{ad}. $$Here \( \beta_j^d(h_j) \) and \( \alpha_i^a(x_j) \) are so-called transfer functions that map a given input value to a desired feature value. The labels \( a \) and \( d \) denote that there can be multiple transfer functions per variable. The first sum depends only on the visible units. The second on the hidden ones. Note that there is no connection between nodes in a layer.
The quantities \( b \) and \( c \) can be interpreted as the visible and hidden biases, respectively.
The connection between the nodes in the two layers is given by the weights \( w_{ij} \).
There are different variants of RBMs, and the differences lie in the types of visible and hidden units we choose as well as in the implementation of the energy function \( E(\mathbf{x},\mathbf{h}) \).
RBMs were first developed using binary units in both the visible and hidden layer. The corresponding energy function is defined as follows:
$$ \begin{align} E(\mathbf{x}, \mathbf{h}) = - \sum_i^M x_i a_i- \sum_j^N b_j h_j - \sum_{i,j}^{M,N} x_i w_{ij} h_j, \label{_auto3} \end{align} $$where the binary values taken on by the nodes are most commonly 0 and 1.
Another varient is the RBM where the visible units are Gaussian while the hidden units remain binary:
$$ \begin{align} E(\mathbf{x}, \mathbf{h}) = \sum_i^M \frac{(x_i - a_i)^2}{2\sigma_i^2} - \sum_j^N b_j h_j - \sum_{i,j}^{M,N} \frac{x_i w_{ij} h_j}{\sigma_i^2}. \label{_auto4} \end{align} $$Other types of units include:
To read more, see Lectures on Boltzmann machines in Physics.
Autoencoders are artificial neural networks capable of learning efficient representations of the input data (these representations are called codings) without any supervision (i.e., the training set is unlabeled). These codings typically have a much lower dimensionality than the input data, making autoencoders useful for dimensionality reduction.
More importantly, autoencoders act as powerful feature detectors, and they can be used for unsupervised pretraining of deep neural networks.
Lastly, they are capable of randomly generating new data that looks very similar to the training data; this is called a generative model. For example, you could train an autoencoder on pictures of faces, and it would then be able to generate new faces. Surprisingly, autoencoders work by simply learning to copy their inputs to their outputs. This may sound like a trivial task, but we will see that constraining the network in various ways can make it rather difficult. For example, you can limit the size of the internal representation, or you can add noise to the inputs and train the network to recover the original inputs. These constraints prevent the autoencoder from trivially copying the inputs directly to the outputs, which forces it to learn efficient ways of representing the data. In short, the codings are byproducts of the autoencoder’s attempt to learn the identity function under some constraints.
Video on autoencodersSee also A. Geron's textbook, chapter 15.
This is an important topic if we aim at extracting a probability distribution. This gives us also a confidence interval and error estimates.
Bayesian machine learning allows us to encode our prior beliefs about what those models should look like, independent of what the data tells us. This is especially useful when we don’t have a ton of data to confidently learn our model.
Video on Bayesian deep learningSee also the slides here.
Reinforcement Learning (RL) is one of the most exciting fields of Machine Learning today, and also one of the oldest. It has been around since the 1950s, producing many interesting applications over the years.
It studies how agents take actions based on trial and error, so as to maximize some notion of cumulative reward in a dynamic system or environment. Due to its generality, the problem has also been studied in many other disciplines, such as game theory, control theory, operations research, information theory, multi-agent systems, swarm intelligence, statistics, and genetic algorithms.
In March 2016, AlphaGo, a computer program that plays the board game Go, beat Lee Sedol in a five-game match. This was the first time a computer Go program had beaten a 9-dan (highest rank) professional without handicaps. AlphaGo is based on deep convolutional neural networks and reinforcement learning. AlphaGo’s victory was a major milestone in artificial intelligence and it has also made reinforcement learning a hot research area in the field of machine learning.
Lecture on Reinforcement Learning.
See also A. Geron's textbook, chapter 16.
The goal of transfer learning is to transfer the model or knowledge obtained from a source task to the target task, in order to resolve the issues of insufficient training data in the target task. The rationality of doing so lies in that usually the source and target tasks have inter-correlations, and therefore either the features, samples, or models in the source task might provide useful information for us to better solve the target task. Transfer learning is a hot research topic in recent years, with many problems still waiting to be studied.
The conventional deep generative model has a potential problem: the model tends to generate extreme instances to maximize the probabilistic likelihood, which will hurt its performance. Adversarial learning utilizes the adversarial behaviors (e.g., generating adversarial instances or training an adversarial model) to enhance the robustness of the model and improve the quality of the generated data. In recent years, one of the most promising unsupervised learning technologies, generative adversarial networks (GAN), has already been successfully applied to image, speech, and text.
Lecture on adversial learning.
Dual learning is a new learning paradigm, the basic idea of which is to use the primal-dual structure between machine learning tasks to obtain effective feedback/regularization, and guide and strengthen the learning process, thus reducing the requirement of large-scale labeled data for deep learning. The idea of dual learning has been applied to many problems in machine learning, including machine translation, image style conversion, question answering and generation, image classification and generation, text classification and generation, image-to-text, and text-to-image.
Distributed computation will speed up machine learning algorithms, significantly improve their efficiency, and thus enlarge their application. When distributed meets machine learning, more than just implementing the machine learning algorithms in parallel is required.
Meta learning is an emerging research direction in machine learning. Roughly speaking, meta learning concerns learning how to learn, and focuses on the understanding and adaptation of the learning itself, instead of just completing a specific learning task. That is, a meta learner needs to be able to evaluate its own learning methods and adjust its own learning methods according to specific learning tasks.
While there has been much progress in machine learning, there are also challenges.
For example, the mainstream machine learning technologies are black-box approaches, making us concerned about their potential risks. To tackle this challenge, we may want to make machine learning more explainable and controllable. As another example, the computational complexity of machine learning algorithms is usually very high and we may want to invent lightweight algorithms or implementations. Furthermore, in many domains such as physics, chemistry, biology, and social sciences, people usually seek elegantly simple equations (e.g., the Schrödinger equation) to uncover the underlying laws behind various phenomena. In the field of machine learning, can we reveal simple laws instead of designing more complex models for data fitting? Although there are many challenges, we are still very optimistic about the future of machine learning. As we look forward to the future, here are what we think the research hotspots in the next ten years will be.
See the article on Discovery of Physics From Data: Universal Laws and Discrepancies
Machine learning, especially deep learning, evolves rapidly. The ability gap between machine and human on many complex cognitive tasks becomes narrower and narrower. However, we are still in the very early stage in terms of explaining why those effective models work and how they work.
What is missing: the gap between correlation and causation. Standard Machine Learning is based on what e have called a frequentist approach.
Most machine learning techniques, especially the statistical ones, depend highly on correlations in data sets to make predictions and analyses. In contrast, rational humans tend to reply on clear and trustworthy causality relations obtained via logical reasoning on real and clear facts. It is one of the core goals of explainable machine learning to transition from solving problems by data correlation to solving problems by logical reasoning.
Bayesian Machine Learning is one of the exciting research directions in this field.Quantum machine learning is an emerging interdisciplinary research area at the intersection of quantum computing and machine learning.
Quantum computers use effects such as quantum coherence and quantum entanglement to process information, which is fundamentally different from classical computers. Quantum algorithms have surpassed the best classical algorithms in several problems (e.g., searching for an unsorted database, inverting a sparse matrix), which we call quantum acceleration.
When quantum computing meets machine learning, it can be a mutually beneficial and reinforcing process, as it allows us to take advantage of quantum computing to improve the performance of classical machine learning algorithms. In addition, we can also use the machine learning algorithms (on classic computers) to analyze and improve quantum computing systems.
Read interview with Maria Schuld on her work on Quantum Machine Learning. See also her recent textbook.
Many quantum machine learning algorithms are based on variants of quantum algorithms for solving linear equations, which can efficiently solve N-variable linear equations with complexity of O(log2 N) under certain conditions. The quantum matrix inversion algorithm can accelerate many machine learning methods, such as least square linear regression, least square version of support vector machine, Gaussian process, and more. The training of these algorithms can be simplified to solve linear equations. The key bottleneck of this type of quantum machine learning algorithms is data input—that is, how to initialize the quantum system with the entire data set. Although efficient data-input algorithms exist for certain situations, how to efficiently input data into a quantum system is as yet unknown for most cases.
In quantum reinforcement learning, a quantum agent interacts with the classical environment to obtain rewards from the environment, so as to adjust and improve its behavioral strategies. In some cases, it achieves quantum acceleration by the quantum processing capabilities of the agent or the possibility of exploring the environment through quantum superposition. Such algorithms have been proposed in superconducting circuits and systems of trapped ions.
Dedicated quantum information processors, such as quantum annealers and programmable photonic circuits, are well suited for building deep quantum networks. The simplest deep quantum network is the Boltzmann machine. The classical Boltzmann machine consists of bits with tunable interactions and is trained by adjusting the interaction of these bits so that the distribution of its expression conforms to the statistics of the data. To quantize the Boltzmann machine, the neural network can simply be represented as a set of interacting quantum spins that correspond to an adjustable Ising model. Then, by initializing the input neurons in the Boltzmann machine to a fixed state and allowing the system to heat up, we can read out the output qubits to get the result.
Machine learning aims to imitate how humans learn. While we have developed successful machine learning algorithms, until now we have ignored one important fact: humans are social. Each of us is one part of the total society and it is difficult for us to live, learn, and improve ourselves, alone and isolated. Therefore, we should design machines with social properties. Can we let machines evolve by imitating human society so as to achieve more effective, intelligent, interpretable “social machine learning”?
And much more.
Early computer scientist Alan Kay said, The best way to predict the future is to create it. Therefore, all machine learning practitioners, whether scholars or engineers, professors or students, need to work together to advance these important research topics. Together, we will not just predict the future, but create it.